
I’ve started venturing into the world of doing remote user testing. This means that instead of recruiting people to come in to the office to do user tests, I use screen sharing technology to see how they use the web site I’m testing on their own computer.
This has lots of benefits, most notably:
- I’m able to talk to people all over the world, not just in San Francisco.
- I can see how the participants use the site on their own machines and browsers.
- Recruiting is typically the most difficult and annoying part of doing user testing. Remote testing is easier to recruit for, since it doesn’t require the participant to go anywhere.
The technical side to this isn’t super easy, but it shouldn’t dissuade you from trying remote testing. I learned the basics of how to set up remote testing thanks to help from my awesome friend Nate Bolt. (Be sure to read his book on remote research when it comes out later this year!)
Here’s the skinny — UserVue is a great tool that is specifically built for remote testing. However, it only works on PCs. If you’re on a Mac, you have to assemble more of a Rube Goldberg-ian app suite. I did lots of tinkering with settings and applications to make this work; when I was done, I realized that these notes could be helpful for others.
THE TOOLS
You will need:
- Mac (either laptop or desktop)
- Acrobat Connect for screensharing. You do not need to buy the “Pro” version, Acrobat Connect Pro. Note that the Adobe site hides the cheap, non-Pro version. Cost: $39.95 a month.
UPDATE:
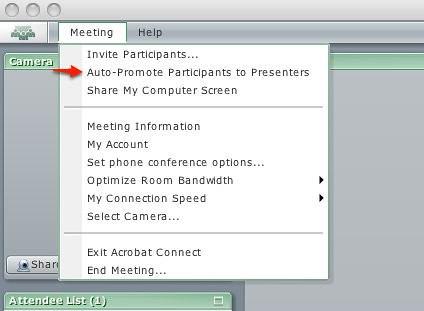
There is a free version that is basically the same but has shinier icons. It’s also slightly less annoying. In this version, you need to click on the participant name and request that they share their screen — no need to “autopromote participants to presenters.” - Soundflower to enable audio recording. Be sure to also install Soundflowerbed during the installation process. Free
- iShowU HD for recording screensharing and audio. You do not need to buy the “Pro” version, iShowU HD Pro. $29.95
- Skype for audio. Free to use but you will need to pay to call phones from Skype. Pay in increments of €10.
- Headset for using Skype. You will need a headset that has a built in microphone. I’m using the Plantronics GameCom Pro 1 for no other reason than I found one in our office. It works well.
(Note that if you’re on a PC, UserVue does what Soundflower + Connect + Skype + iShowU does.)
SETUP INSTRUCTIONS
Sound on the computer:
Under System Preferences on the Mac, select Sound, then:
- Output: Soundflower (2ch)
- Input: headset
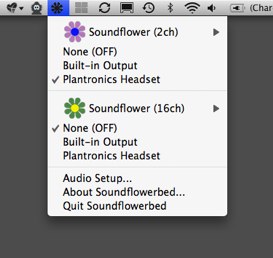
Soundflowerbed:
Under Soundflower (2CH), change from None (OFF) to headset
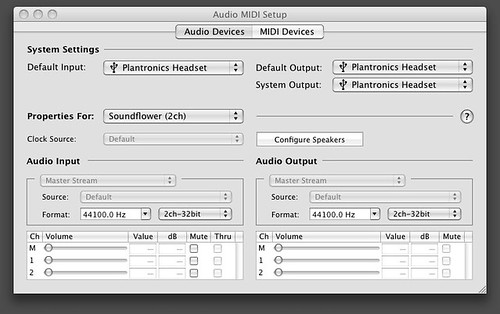
Select “Audio Setup…” then Audio Devices
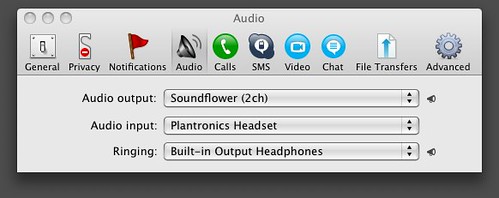
Skype:
Under Preferences, select Audio
- Audio Output > Soundflower (2ch)
- Audio Input > headset
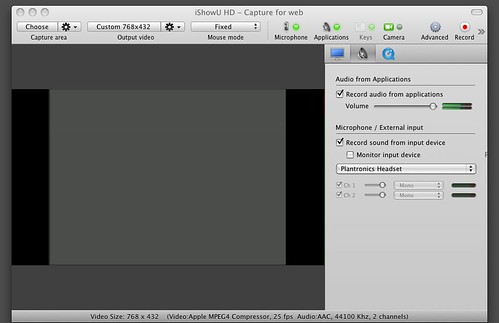
iShowU HD:
In the menu bar, make sure:
- Microphone capture enabled
- Application capture enabled
Go to Advanced Options and click on the megaphone to adjust sound preferences.
- Select: Record audio from applications
- Select: Record sound from input device
- DO NOT Select: Monitor input device
- Select name of headset from dropdown
Choose the area of your screen to record. Click “Choose” to select your capture area and toggle over to your Adobe Connect window and trace around the meeting space.
Adobe Connect:
Under “Meeting,” select “Auto-Promote Participants to Presenters
SESSION MECHANICS
- Moderator calls participant using Skype. Audio quality will be better if you call them on a mobile or landline number rather than on Skype.
- Make sure that they are at the Connect URL: http://connect.acrobat.com/XXXX
- Instruct the participant to Select “Enter as Guest” and type their name. Tell them that you will approve them to enter the meeting. Approve them to enter the meeting once they have done this.
- Ask the participant to click “Share Your Screen.”
- Tell the participant that they will be prompted to install the Adobe Acrobat Connect Add-In if they don’t already have it.
- Connect will then open for them in a new window. Ask them to click “Share Your Screen” again.
- Tell the participant that where you see “Start Screen Sharing” select “Applications” then the name of the window where the website is open that you’ll be discussing.
- At the end of the session remind the participant to select “Stop Sharing” at the bottom of the Connect window.
– – – – – – –
I’m interested in hearing about your experiences doing remote testing. Do you have gripes? Inspiring stories? Tips for other people doing user research? Good luck and have fun!
wow lady! this is invaluable information.
I haven’t had a chance to go through and try everything, but this erodes most of the excuses for not doing user testing.
Thank you!
Great post, Julie! I’m going to try a variation on a theme of this in the next couple weeks!
Hey Julie, that was a very interesting post.
Thanks.